Consumer Rights Wiki:Write your first article!: Difference between revisions
No edit summary Tag: Manual revert |
add meta description |
||
| (10 intermediate revisions by 4 users not shown) | |||
| Line 1: | Line 1: | ||
{{#seo: | |||
|title=Write Your First Article - Consumer Rights Wiki | |||
|description=Step-by-step guide for new Consumer Rights Wiki contributors. Covers minimum requirements, article structure, verifiable claims, and editorial standards. | |||
|og:title=Write Your First Article - Consumer Rights Wiki | |||
|og:description=Step-by-step guide for new Consumer Rights Wiki contributors. Covers minimum requirements, article structure, verifiable claims, and editorial standards. | |||
|og:type=article | |||
|keywords=consumer rights wiki, write article, contribute, getting started, new contributor, guide | |||
}} | |||
<!-- This prevents linking to the section of the same name below. Contributors need to read these first two paragraphs first, otherwise they risk doing a bunch of work all for nothing. --> | <!-- This prevents linking to the section of the same name below. Contributors need to read these first two paragraphs first, otherwise they risk doing a bunch of work all for nothing. --> | ||
<!-- NB: Additions should only be about issues that can't be fixed in 5 minutes. Before adding to this article, consider that the longer it gets, the less users will read. --> | <!-- NB: Additions should only be about issues that can't be fixed in 5 minutes. Before adding to this article, consider that the longer it gets, the less users will read. --> | ||
| Line 5: | Line 13: | ||
Before getting started, you need to know some of the requirements for a new article on this wiki. The [[Consumer Rights Wiki:Wiki policy index|wiki policy]] covers all the guidelines that mature articles need to follow, but reading these guidelines from start to finish may be a daunting task for new contributors. The next section describes the minimum requirements in order to write an article that can be molded into complying with these guidelines in a reasonable amount of time. The last section describes how to edit and create articles. | Before getting started, you need to know some of the requirements for a new article on this wiki. The [[Consumer Rights Wiki:Wiki policy index|wiki policy]] covers all the guidelines that mature articles need to follow, but reading these guidelines from start to finish may be a daunting task for new contributors. The next section describes the minimum requirements in order to write an article that can be molded into complying with these guidelines in a reasonable amount of time. The last section describes how to edit and create articles. | ||
Don't have a topic to write about? Visit [[ | Don't have a topic to write about? Visit [[Article suggestions]] to see what the wiki needs! | ||
==Video guide== | ==Video guide== | ||
<br/> | <br /> | ||
{{#ev:youtube|KlcXvKTWLY4|720|center|How to create a new article on ConsumerRights.wiki}} | |||
==Minimum requirements== | ==Minimum requirements== | ||
| Line 16: | Line 24: | ||
===Claims must be easily verifiable=== | ===Claims must be easily verifiable=== | ||
{{Main|Consumer Rights Wiki:Verifiability}} | |||
A claim is verifiable if: | A claim is verifiable if: | ||
*A verifiable source can easily be found by means of an internet search, or | *A verifiable source can easily be found by means of an internet search, or | ||
*A verifiable source has been referenced using the instructions in [[ | *A verifiable source has been referenced using the instructions in [[Consumer Rights Wiki:Verifiability#How to make an inline citation|adding references]] | ||
Articles should only consist of verifiable claims. Claims that make assumptions or are based on personal experiences or isolated incidents are not valid. For example, "Motorola is pushing updates to their older phones that intentionally slow them down" would only be considered valid if a verifiable source proves it. | Articles should only consist of verifiable claims. Claims that make assumptions or are based on personal experiences or isolated incidents are not valid. For example, "Motorola is pushing updates to their older phones that intentionally slow them down" would only be considered valid if a verifiable source proves it. | ||
| Line 44: | Line 52: | ||
==Creating an article== | ==Creating an article== | ||
Ready to make an new article? Click the [[Consumer_Rights_Wiki:Create_page|Create page]] link on the sidebar. Make sure that the name of the article is singular and in | Ready to make an new article? Click the [[Consumer_Rights_Wiki:Create_page|Create page]] link on the sidebar. Make sure that the name of the article is singular and in sentence case (only the first word and proper nouns should be capitalized). If you are new around here and not sure how to get started, you can find some tips below. | ||
===Article info form=== | |||
Most of the time, upon entering a name for your article, you'll be taken to a form where you can add in some basic info about the subject of your article. Just fill in as much of it as you can, and don't worry about leaving any fields blank, as they can be filled in by yourself or someone else later. The information will be used to auto-populate a table in the article, and provides the wiki with some useful machine-readable data. | |||
===Basic | ===Basic editing=== | ||
*You can make edits using the '''visual editor''' by clicking the "edit" button at the top of an article, or using the '''source editor''' by clicking "edit source" instead. | *You can make edits using the '''visual editor''' by clicking the "edit" button at the top of an article, or using the '''source editor''' by clicking "edit source" instead. | ||
**The '''visual editor''' is easier to use. It's '''recommended''' to start with this. It's more intuitive in multiple ways, but doesn't allow for complete control like the source editor. | **The '''visual editor''' is easier to use. It's '''recommended''' to start with this. It's more intuitive in multiple ways, but doesn't allow for complete control like the source editor. | ||
**The '''source editor''' is the advanced editor. | **The '''source editor''' is the advanced editor. Certain things are much easier in it, but it's safe to ignore for your first few edits and check it out when you're comfortable with the visual editor. It allows for direct access to the markup language, and generally has more features and control. One downside is that you have to click '''Preview''' to see how it'll look. | ||
*The wiki uses a markup language called [[mediawikiwiki:Help:Formatting|wikitext]] for formatting. For example, <code><nowiki>'''bold'''</nowiki></code> for '''bold''' text and <code><nowiki>[[link|text to display for the link]]</nowiki></code> for a [[Consumer_Rights_Wiki:Style_guide|link]]. The visual editor can handle most of this. | *The wiki uses a markup language called [[mediawikiwiki:Help:Formatting|wikitext]] for formatting. For example, <code><nowiki>'''bold'''</nowiki></code> for '''bold''' text and <code><nowiki>[[link|text to display for the link]]</nowiki></code> for a [[Consumer_Rights_Wiki:Style_guide|link]]. The visual editor can handle most of this. | ||
| Line 68: | Line 77: | ||
:*You can experiment in the [[Sandbox|sandbox]] if you want to try editing without affecting any real pages. | :*You can experiment in the [[Sandbox|sandbox]] if you want to try editing without affecting any real pages. | ||
===Adding references=== | ===Adding references=== | ||
Latest revision as of 03:11, 30 March 2026
Welcome to the Consumer Rights Wiki! If you're reading this, you likely share our desire to see consumers treated more fairly. This article will help you to start documenting an instance of "new" consumer exploitation, so you can help us to further that cause.
Before getting started, you need to know some of the requirements for a new article on this wiki. The wiki policy covers all the guidelines that mature articles need to follow, but reading these guidelines from start to finish may be a daunting task for new contributors. The next section describes the minimum requirements in order to write an article that can be molded into complying with these guidelines in a reasonable amount of time. The last section describes how to edit and create articles.
Don't have a topic to write about? Visit Article suggestions to see what the wiki needs!
Video guide
Minimum requirements
New articles must, at a minimum, meet the following three requirements:
Claims must be easily verifiable
- Main article: Consumer Rights Wiki:Verifiability
A claim is verifiable if:
- A verifiable source can easily be found by means of an internet search, or
- A verifiable source has been referenced using the instructions in adding references
Articles should only consist of verifiable claims. Claims that make assumptions or are based on personal experiences or isolated incidents are not valid. For example, "Motorola is pushing updates to their older phones that intentionally slow them down" would only be considered valid if a verifiable source proves it.
Include at least one verifiable source
Every article must include at least one verifiable source. This allows contributors to understand why certain claims were made, as well as to expand on the article using the information provided by the source.
For more information about what constitutes a verifiable source, see the wiki content policies.
Verifiable sources do not include anecdotal social media posts. For example, the public opinion reflected by the comments under a Reddit post is not a verifiable source.
Issues must be systemic
This wiki is not the place to document isolated incidents, such as a company who unfairly rejected a few warranty claims or a plumbing contractor who charged you more than they should have. The incidents documented in this wiki have affected large amounts of consumers.
The following examples were summarized from the moderator guidelines:
- Not systemic
-
- Amazon broke into my garage.
- AppleCare replaced my Apple Watch multiple times, costing me nearly $1,300. All replacements were scratched and lacked functionality.
- Systemic
-
- Galaxy Fold blank screen update: The Galaxy Fold received an update that caused auto-rotate failures, blank screens and sound problems in many devices. Samsung only offered paid repairs, claiming that the issue affected only 3% of users.
- Motorola warranty issue: Users report extended service times and denied warranty claims across different countries with their devices, which started experiencing issues after updates under Lenovo ownership.
Creating an article
Ready to make an new article? Click the Create page link on the sidebar. Make sure that the name of the article is singular and in sentence case (only the first word and proper nouns should be capitalized). If you are new around here and not sure how to get started, you can find some tips below.
Article info form
Most of the time, upon entering a name for your article, you'll be taken to a form where you can add in some basic info about the subject of your article. Just fill in as much of it as you can, and don't worry about leaving any fields blank, as they can be filled in by yourself or someone else later. The information will be used to auto-populate a table in the article, and provides the wiki with some useful machine-readable data.
Basic editing
- You can make edits using the visual editor by clicking the "edit" button at the top of an article, or using the source editor by clicking "edit source" instead.
- The visual editor is easier to use. It's recommended to start with this. It's more intuitive in multiple ways, but doesn't allow for complete control like the source editor.
- The source editor is the advanced editor. Certain things are much easier in it, but it's safe to ignore for your first few edits and check it out when you're comfortable with the visual editor. It allows for direct access to the markup language, and generally has more features and control. One downside is that you have to click Preview to see how it'll look.
- The wiki uses a markup language called wikitext for formatting. For example,
'''bold'''for bold text and[[link|text to display for the link]]for a link. The visual editor can handle most of this.
- Here are some examples:
- Bold text:
'''bold text''' - Italic text:
''italic text'' - Bold and italic text:
'''''bold and italic''''' Strikethrough text:<s>Strikethrough</s>- Internal link:
[[Page name]] - Internal link with custom text:
[[Page name|custom text]] - External link:
[https://example.com Example]→ Example - Headings:
== Heading 2 ==,=== Heading 3 === - Lists:
- Bullet:
* Item - Numbered:
# Item
- Bullet:
- Sign your comments on talk pages with:
~~~~→ automatically adds your name and timestamp. Make sure you always do so when using talk pages.
- Bold text:
- You can experiment in the sandbox if you want to try editing without affecting any real pages.
Adding references
New references
To reference a new source:
-
Place the cursor after a claim.

-
Click on "Insert" → "Citation", or press Ctrl+Shift+K.
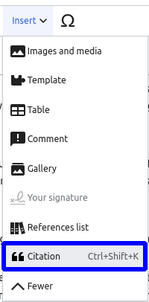
-
Click the "Manual" option and choose the type of citation you wish to add.
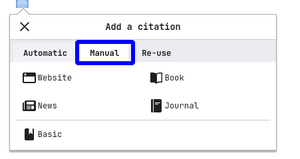
- In the following tab add the information for your citation. (If you don't have enough time choose the "Basic" option to add a simple link)


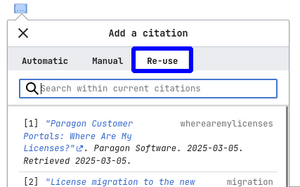
Existing references
To re-use a source that is referenced elsewhere on the same page:
-
Place the cursor after a claim.

-
Click on "Insert" → "Citation", or press Ctrl+Shift+K.
- Click the "Re-use" option and choose the type of citation you wish to re-use.